Building a Blockchain Application with Plutus

The post Building a Blockchain Application with Plutus appeared first on Coinpedia Fintech News
Introduction
Blockchain is contributing to various industries through its decentralized and transparent solutions. The advancements in the development domain have had a transformative shift on developers and communities. The Benefits of blockchain extend beyond decentralization. Itve saves the time taken for the transaction and doesn’t need any third-party verification, reducing fraud and cyber-attack risks. As a developer, understanding how to build blockchain applications is valuable, especially when using powerful tools like Plutus. Plutus is a smart contract platform on the Cardano blockchain. It offers a robust framework for developers to create secure and efficient decentralized applications (DApps).
What is Cardano?
Cardano A blockchain platform launched by Charles Hoskinson (co-founder of Ethereum)in 2017. Cardano is a third-generation platform, often considered an alternative to Ethereum, a second-generation platform. It uses a proof of stake mechanism which is more efficient than the traditional ones. Cardano has its own cryptocurrency ADA, named after Ada Lovelace. It has two separate layers, one that handles the transactions and accounts whereas the other is used to manage the smart contracts and computation. Cardano aims to create a blockchain platform that is more secure, scalable, and adaptable than its predecessors and is being used in various applications, including supply chain management, digital identity verification, and financial services in emerging markets
Plutus
Plutus is a programming language used to write Cardano-based smart contracts. Plutus is based on Haskell which is a functional language. As a developer, you don’t need to write the Plutus Core rather all the scripts will be generated by a Haskell compiler plugin. Plutus supports Formal verification which provides a way to prove the correctness of a program using maths. Hence enhancing the security and reducing the probability of any bugs in the smart contract.
Plutus is natively integrated into the Cardano blockchain, allowing developers to interact directly with Cardano’s ledger and infrastructure. This helps you build and deploy the smart contracts that interact with the Cardano ecosystem directly. Plutus has tools that help you to simulate the smart contracts without the full Cardano node and experiment before deploying it on the mainnet. Plutus is well-suited for developers looking to create reliable and high-performance decentralized applications.
Audience
This article is targeted towards developers who are new to blockchain development with little knowledge of basic programming. We will walk you through the essential steps of setting up your environment, understanding blockchain concepts, and building a simple blockchain application using Plutus.
Setting Up the Development Environment
Having a perfect setup before you kickstart the journey of development is crucial. Hence setting up an environment that supports Plutus is the stepping stone of this chapter.
1. Installing Plutus
Download Plutus from the official repository:
| git clone https://github.com/input-output-hk/plutus-apps.git cd plutus-apps nix-shell |
Verify installation using: plutus -v
2. Choosing an IDE
While developing applications with Plutus having the right IDE is crucial. Plutus is based on Haskell hence having an IDE supporting Haskell is recommended.Two popular options for Plutus development are Visual Studio Code (VS Code) and Plutus Playground. Here’s an expanded guide on how to set up and use these IDEs for Plutus development.
Visual Studio Code: VS Code is a very flexible and versatile Code editor that supports almost every language and has very helpful extensions. Hence it is the developers’ favorite editor to work on. VSCode is open source and provides wide range of tools and features to complete the code.
Steps to set up VSCode:
- Download VSCode from the official site(accoding to your operating system)
- Install the software
- Plutus is built on Haskell, so you need to install the Haskell Platform, which includes the Glasgow Haskell Compiler (GHC) and cabal (a build tool for Haskell).
- Download Haskell
- Install the Haskell extensions in VS Code( Haskero,Haskell Syntax Higlighting, etc)
- Configure the extensions and set up additional extensions
- Since you have already installed Plutus you are ready to go!!
Plutus Playground: Plutus playground is an online web based editor particularly for Plutus smart contracts. Hence there is no need for any installation and is perfect for beginners to gain some confidence while coding.
You can visit the Plutus Playground website and just get started!!
Both environments can be used effectively for Plutus development, and you may find that combining the two—using VS Code for larger projects and Plutus Playground for quick testing and prototyping—provides the best of both worlds.
3. Installing Required Libraries
Use cabal to install essential libraries for Plutus development.
Understanding Blockchain Concepts with Plutus
Blockchain is a distributed and advanced database that stores the records of transactions in the form of blocks. Each of the blocks needs to be linked with the other using cryptographic principles. Robust mechanisms are used to safeguard the blocks due to which one can’t alter any records of the currencies before time and without affecting the subsequent blocks.
Blockchain has three basic components:
- Blocks: Blocks contain information about transactions along with metadata. All blocks are linked with each other through hashing which forms a chain of blocks, hence blockchain
- Transactions: A transaction is a transfer of data from one entity to another within the blockchain. In Plutus, transactions are written in Haskell and involve input and output UTXOs (Unspent Transaction Outputs).
- Chains: In Plutus, the chain maintains the order of transactions and ensures that they are immutable once confirmed.
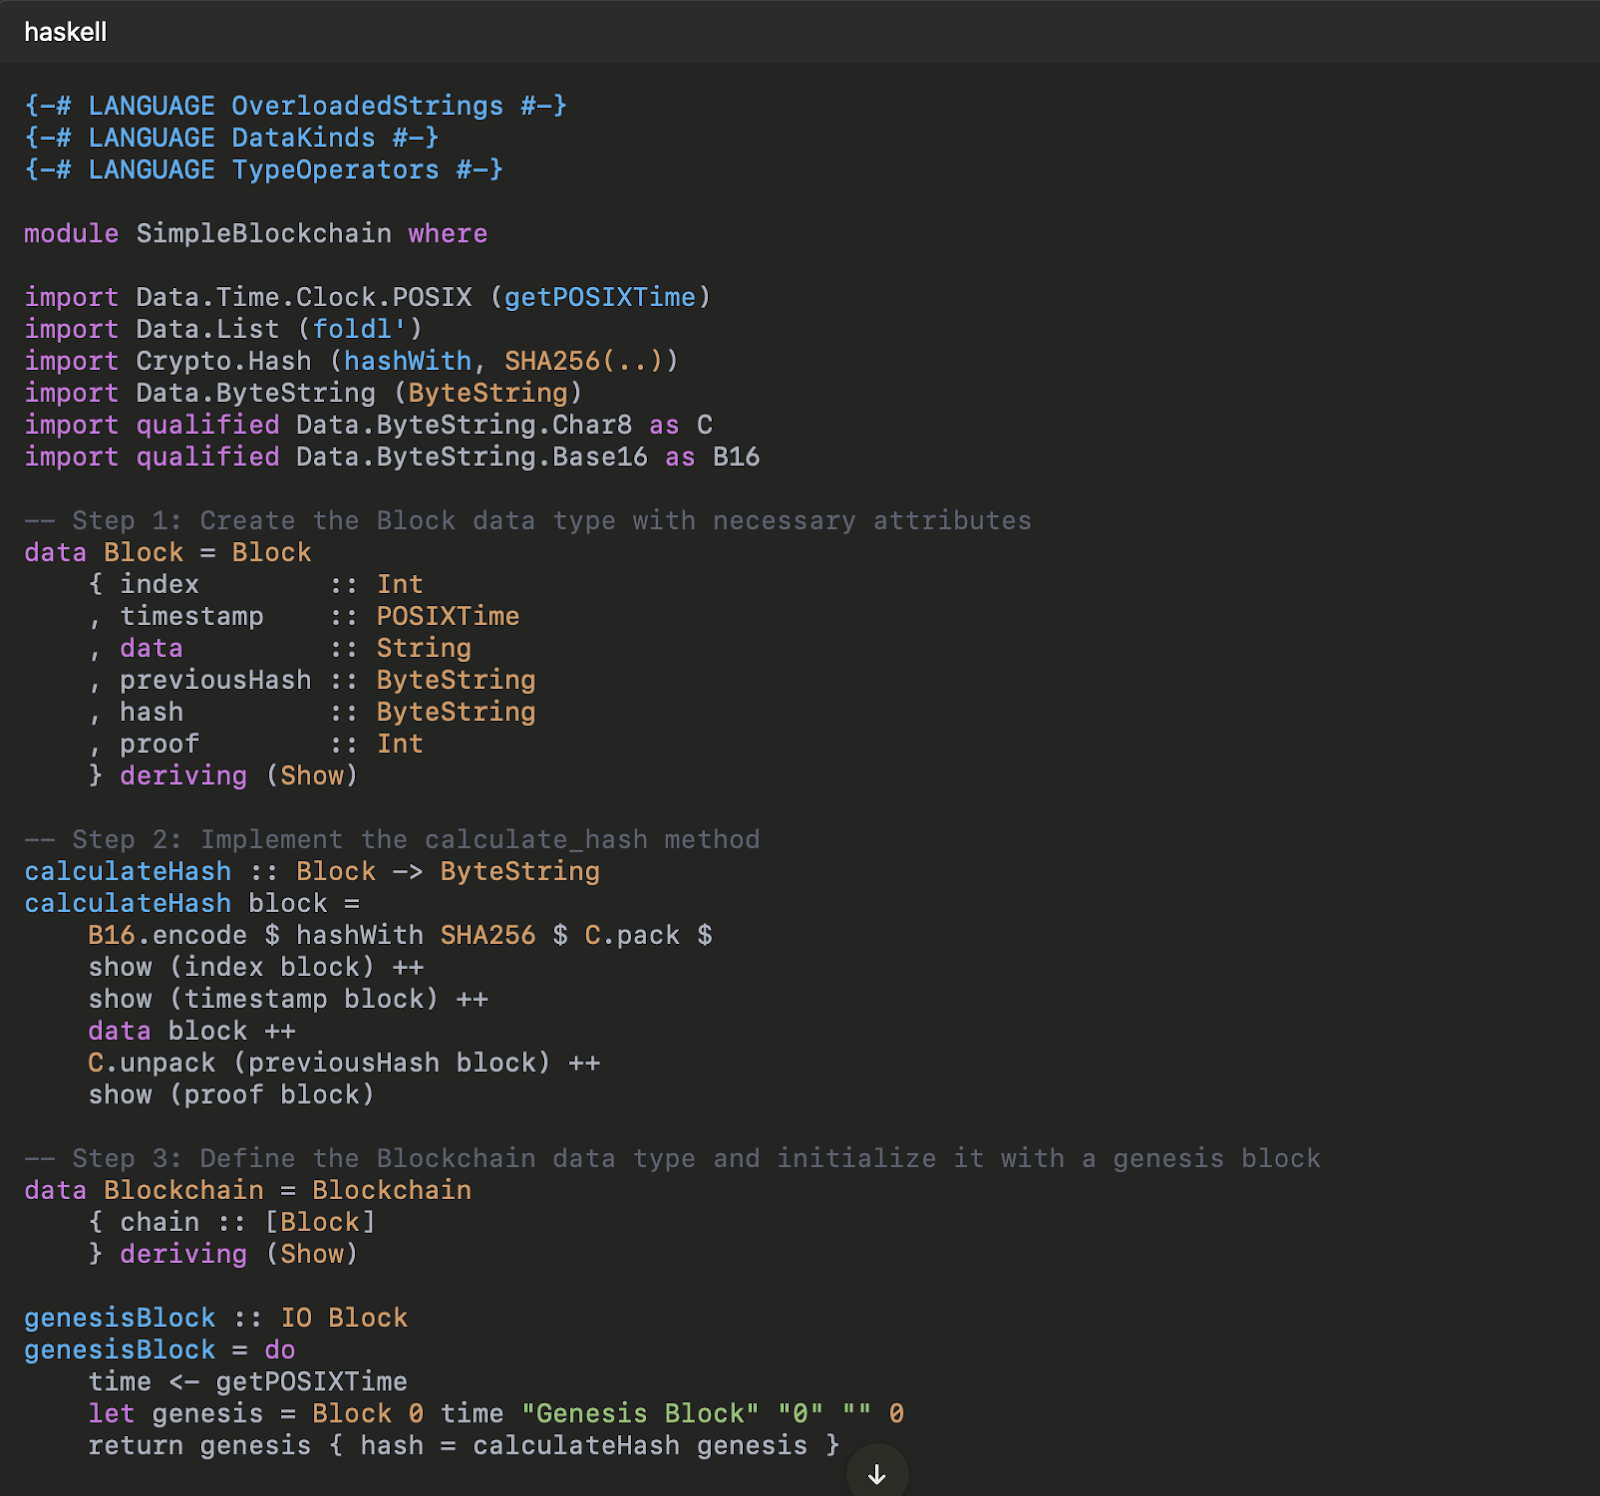
In the following code snippet we can see the structure of the Block in Plutus:
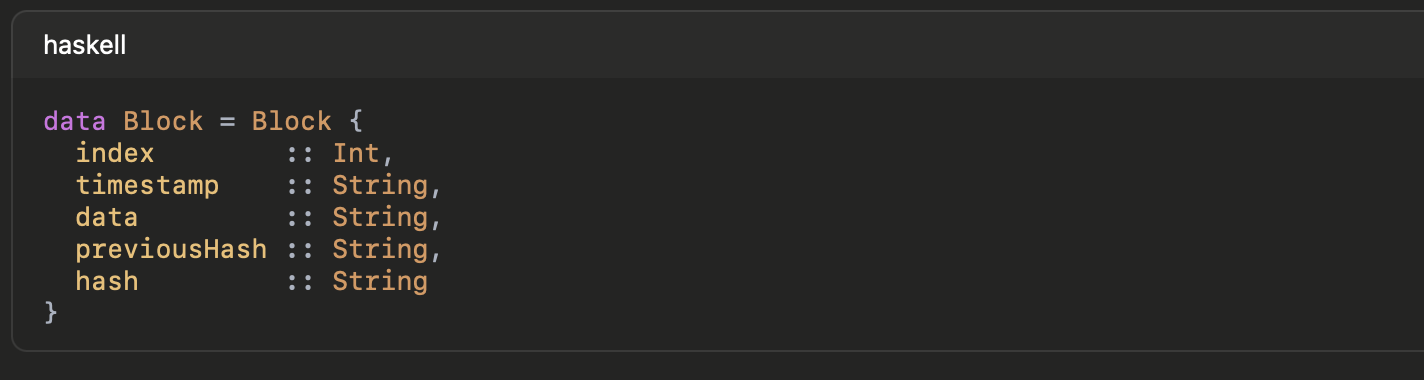
Every component of the block is mentioned along with its data type
- The index is an integer that tells the position of a block
- Timestamp is the time at which the block was created
- Transactions is the string or a list of all the transactions included in a particular block
- Hash is a unique pattern and the primary key to identifying a block
- The previous hash refers to continuity and is the hash of the last block
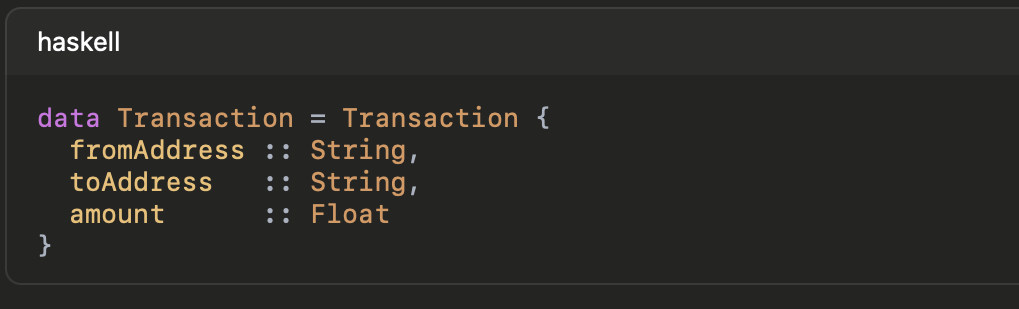
In this code snippet we can see the structure of Transactions in Plutus:
Decentralization, Immutability, and Consensus Mechanisms:
The foundation of blockchain relies on three core principles: Decentralization, Immutability and consensus Mechanism
Decentralization: Decentralization is a property by which no single entity holds control over the database of Blockchain making the failure of the system and biasedness nearly impossible. Each participant device (node) maintains a copy of the blockchain, ensuring transparency and inhibiting centralized failure or manipulation.
Immutability: Once data is written into a blockchain, it cannot be changed without altering all subsequent blocks. This is done with the help of cryptographic hashing. Hence all the changes done once can’t be undone making it immutable.
Consensus Mechanism: A set of protocols governing all the necessities of blockchain. All nodes in the network need to agree on the methods. Consensus mechanisms are used to streamline the nodes and ensure all the nodes in the network are on the same page.
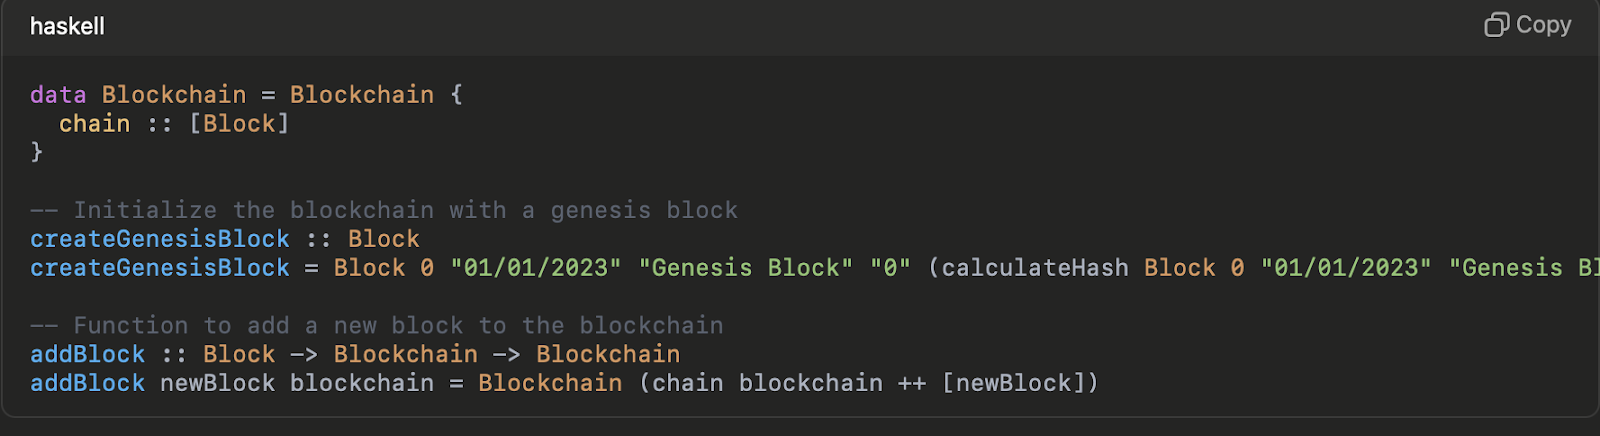
Building a Simple Blockchain with Plutus
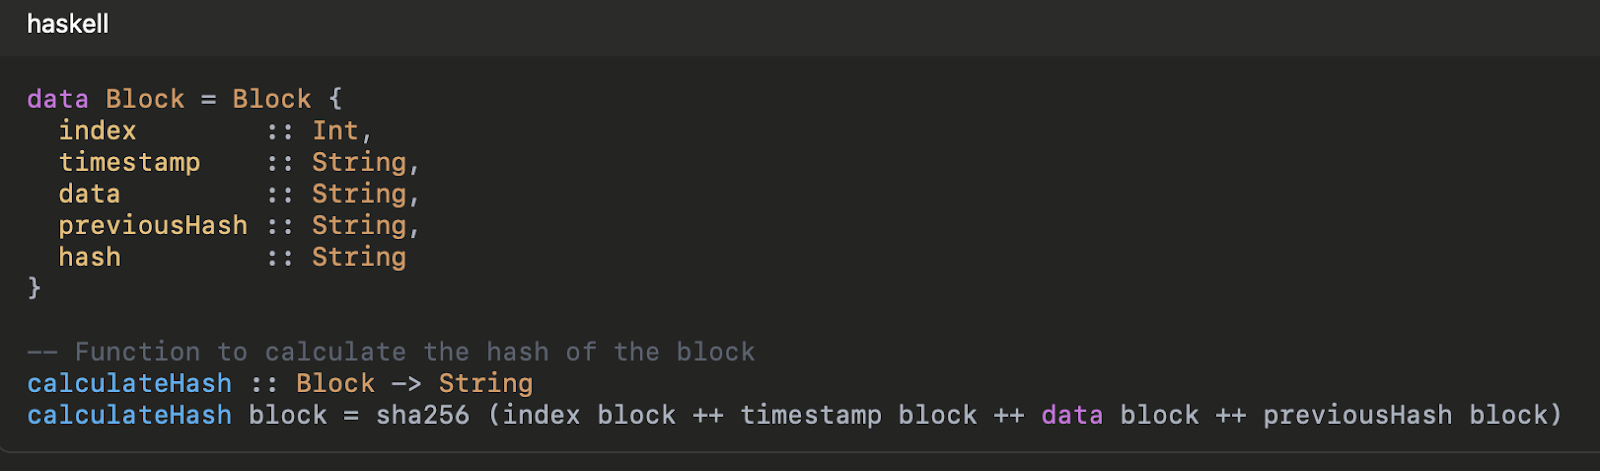
Block is the primitive unit of any blockchain. In this code snippet, we have defined a block data type along with its components.
Also after we have defined the block class we need to ensure the integrity of the blockchain where each block must have a unique hash. Hence with the calculate hash function, we use SHA256 popular hashing method for the same in Plutus.
Once you complete the Definition of a block, go ahead and initialize your blockchain with the help of a genesis block which is the first block for any blockchain. Wow!! You have just created a blockchain but that’s not it, you need to add new blocks and retrieve the latest block also.
Go ahead and refer to the code below in case you need any help!
Implementing Consensus Mechanisms in Plutus
Cardano utilizes the PoS mechanism while first, it had adopted the Proof of Work. Plutus is designed to be compatible with Cardano’s Ouroboros PoS protocol, offering scalability, energy efficiency, and security for decentralized applications (DApps).
Here’s an overview of consensus algorithms that can work with Plutus
- Ouroboros: Ouroboros is a Proof of stake mechanism that the Plutus is highly compatible with and it depends on the stake of the ADA that the validators are willing to take up to validate a new block. Plutus contracts interact seamlessly with the Ouroboros protocol, ensuring that the execution of smart contracts remains secure and energy-efficient.
- Proof of Work: PoW is the most ancient mechanism and was widely used in all the older cryptocurrencies. It can still be implemented on paper in the case of Plutus. This would be more useful while thinking of isolated scenarios like educational purposes and experimental purposes.
- Delegated proof of work & Byzantine fault Tolerance: These mechanisms are not particularly compatible with Cardano but still can be theoretically implemented on Plutus.
In this section, we will explore how can one use Proof of Work in Plutus.
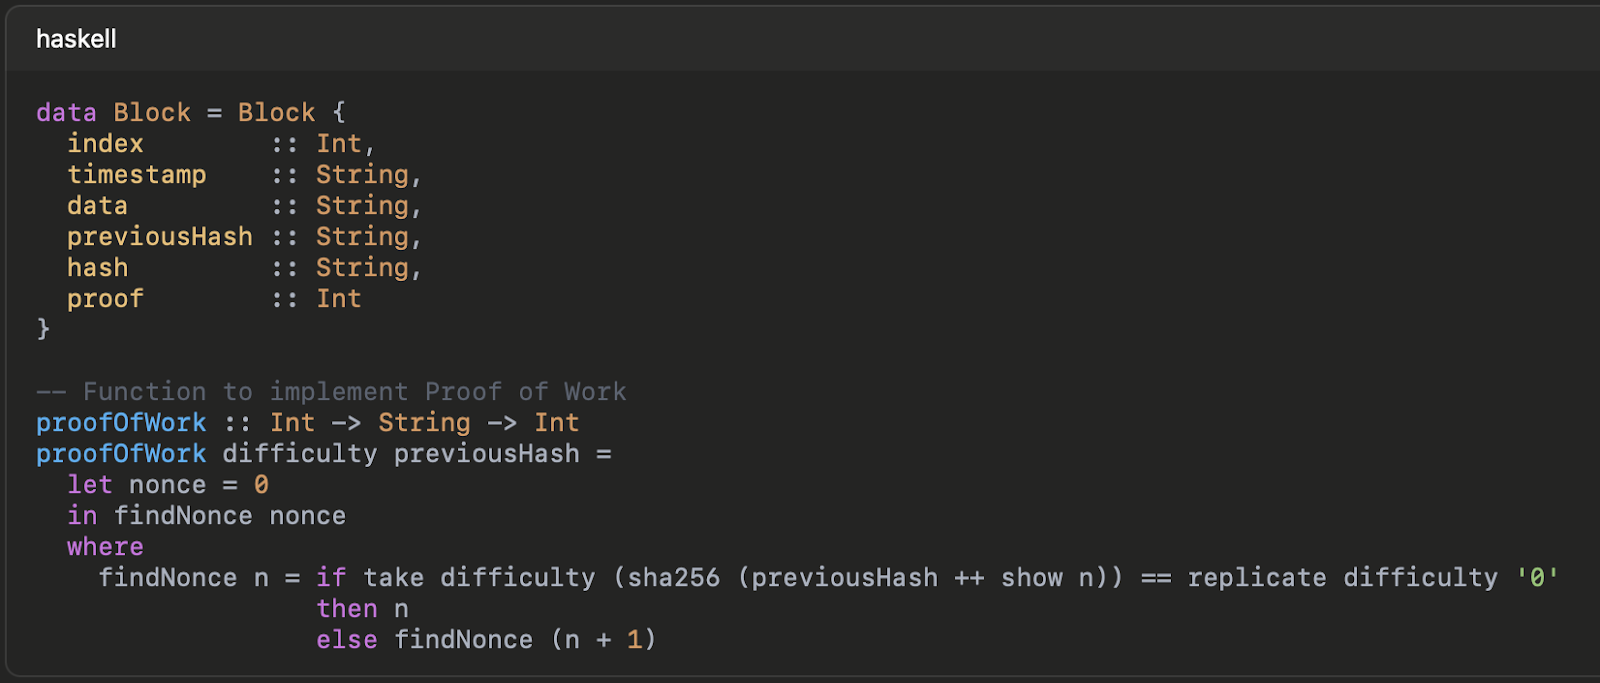
In Proof of Work, miners need to compete in time to solve a cryptographic puzzle to become validators of the new coin. In this code, the proof of work function searches for a nonce that, when combined with the previous block’s hash, produces a hash with a certain number of leading zeros. This is a basic implementation of PoW, where the difficulty level determines how hard it is to find a valid nonce.
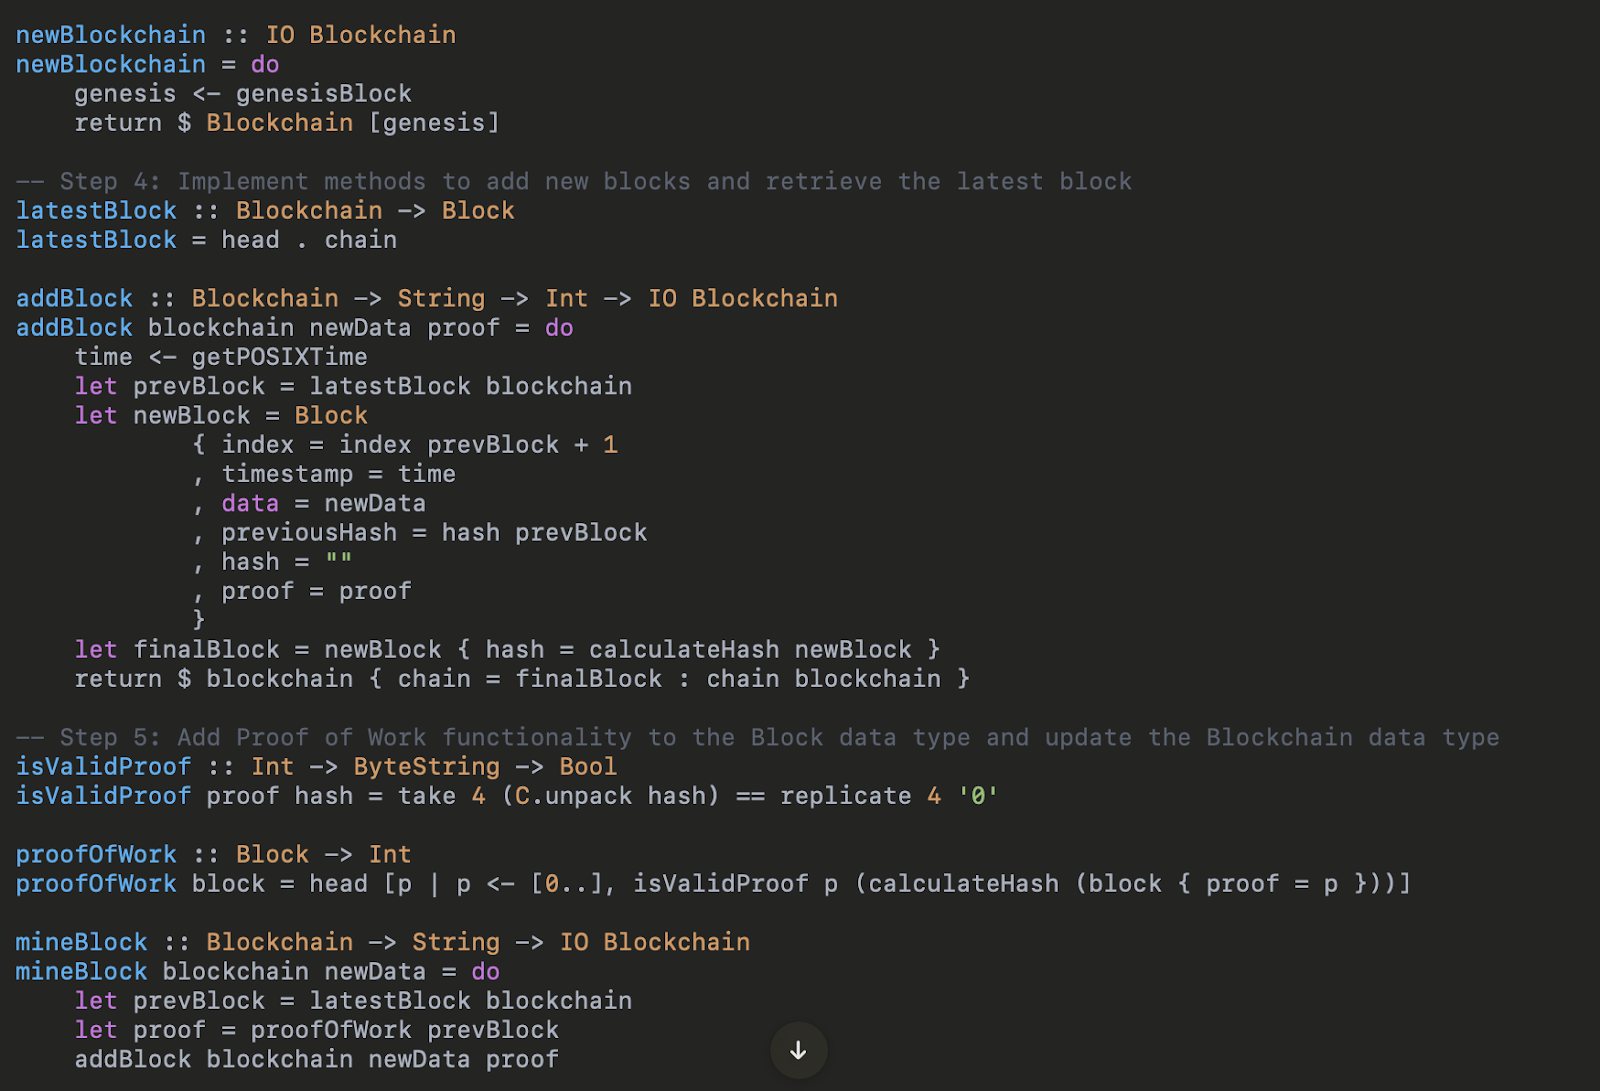
Once you complete the Proof of Work implementation you need to update the blockchain to validate the proof that was mined.
Here is the example code snippet:

This function ensures that a new block is only added to the blockchain if its proof is valid, maintaining the chain’s integrity.
Creating a Simple Blockchain API with Plutus
In this chapter, you will learn how to create a simple API for interacting with a blockchain application built using Plutus. This API will allow you to add blocks and view the blockchain through HTTP requests.
Steps to create an API:
- Set up the Environment for API: Install Haskel(Which is already done), nextly Install Servant using Cabal
- Download all the required libraries:
- Servant: To create the API
- Aeson to encode and decode the JSON: cabal install aeson plutus-core
- Plutus to integrate all the code and logic
To start with Building the API we need to first add a new block and retire the current state of the blockchain. Both of these steps have been performed in the above chapters.
Now you can go ahead and define the endpoints:
| {-# LANGUAGE DataKinds #-} {-# LANGUAGE TypeOperators #-} module BlockchainAPI where import Servant — Define the Block type (refer to Chapter 3) — Blockchain is simply a list of Blocks — Placeholder for the blockchain, initially starting with just the genesis block — Handler for retrieving the chain
viewChainHandler :: Blockchain -> Handler Blockchain –Main entry point to run the API |
Explanation of the above code:
- Block is defined similarly to the previous chapters
- Servant library is used to define the structure of the API. There are two methods to define API endpoints,GET and POST meaning retrieve and add the blockchain respectively.
- We have also defined handlers (addBlockHandler) to handle the new blocks that are being added andviewChainHandler) viewing the other block
- At the end, there is a main function that is the heart of the code binds everything together, and runs the API server.
After the API definition, you have two methods to add the Endpoints and retrieve the Blockchain Endpoint information.

Yay!! You have successfully implemented this subsection and now you can rum the API using cabal and you are good to go for the next part.
Running and Testing the Application
After building the blockchain API, it’s time to test it. We will use Postman or curl to interact with the API and verify that it works correctly.
Steps to Run and Test the Application:
- Compile the program and run it: cabal build cabal run
- Start the server : The API should be available at http://localhost:8080
- Test and add the Block endpoints
| { “index”: 1, “timestamp”: “2024-09-12 12:30:00”, “dataField”: “This is my new block”, “previousHash”: “some_hash”, “hash”: “new_block_hash”} |
View the Blockchain
| curl http://localhost:8080/chain |
By following these steps, you now have a simple blockchain application running with an API built using Plutus. The API allows external applications or users to interact with your blockchain by adding new blocks and viewing the current blockchain state.
Live Example of Building a Blockchain Application with Plutus
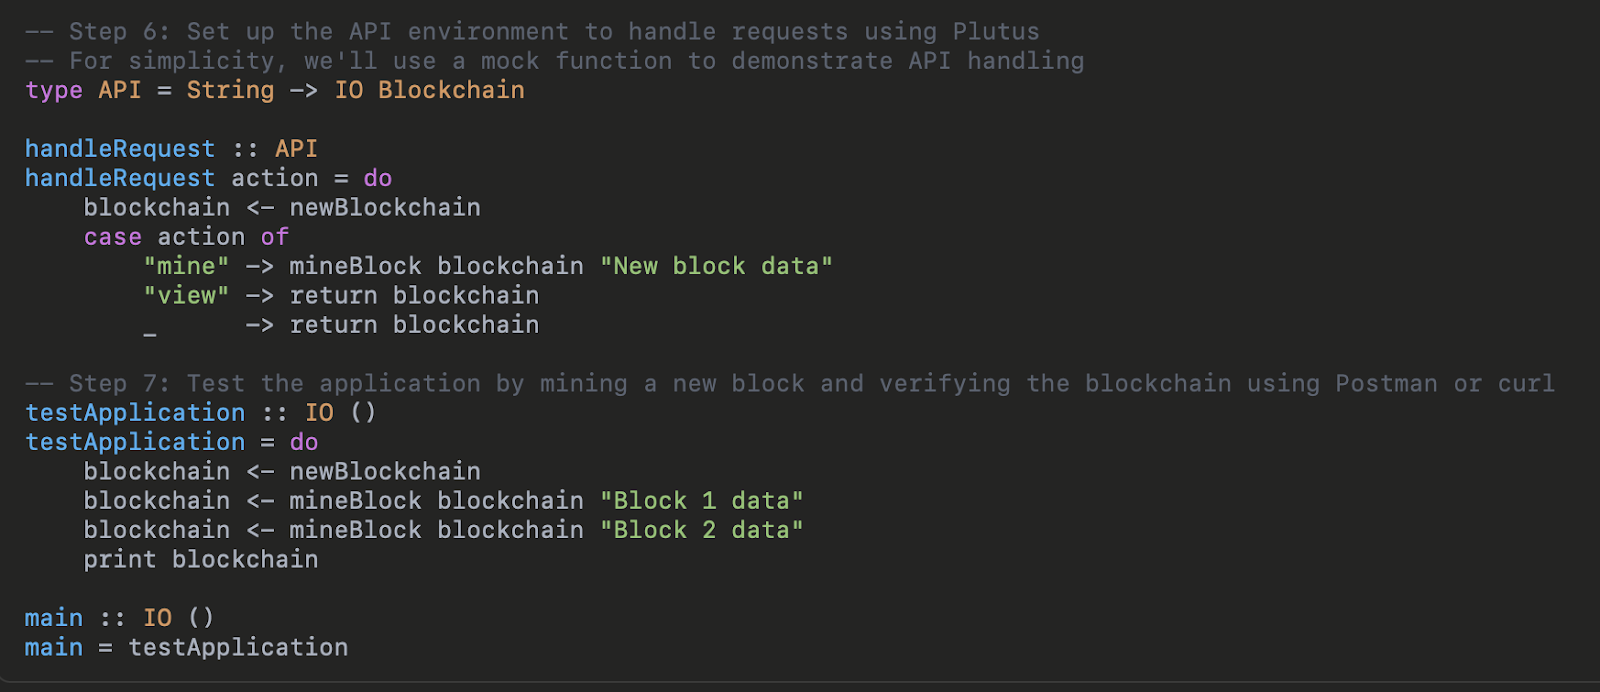
The above Code snippet is a Step-by-Step Execution of:
- Step 1: Create the Block data type with necessary attributes using Plutus syntax.
- Step 2: Implement the calculate_hash method.
- Step 3: Define the Blockchain data type and initialize it with a genesis block.
- Step 4: Implement methods to add new blocks and retrieve the latest block using Plutus.
- Step 5: Add Proof of Work functionality to the Block data type and update the Blockchain data type.
- Step 6: Set up the API environment to handle requests using Plutus.
- Step 7: Test the application by mining a new block and verifying the blockchain using Postman or Curl
Congratulations! You have reached the end of the module and learned all the basics of Plutus.
As you venture into blockchain development with Plutus, you’re not just writing code—you’re crafting the backbone of decentralized systems that could redefine industries. Keep Learning and Happy Coding !!
Also Check Out: How to Design, Develop, & Deploy Your Own Cryptocurrency: A Step-by-Step Guide